
There is a very small shop update over at my etsy shop, in my upcycled journals section. These are old books destined to be landfill that I simple repurpose into journals. They're not collaged, but they are unique and very fun and sometimes very beautiful (see Mona Lisa journal).
If you're looking for a hand-made gift for under $20, please take a peek! xo
Friday, July 29, 2011
Thursday, July 28, 2011
...the way a river went.

It is pleasant to have been to a place the way the river went.
Henry David Thoreau
Wishing you wonderful weekends! xo
Wednesday, July 27, 2011
Upcycled Journals


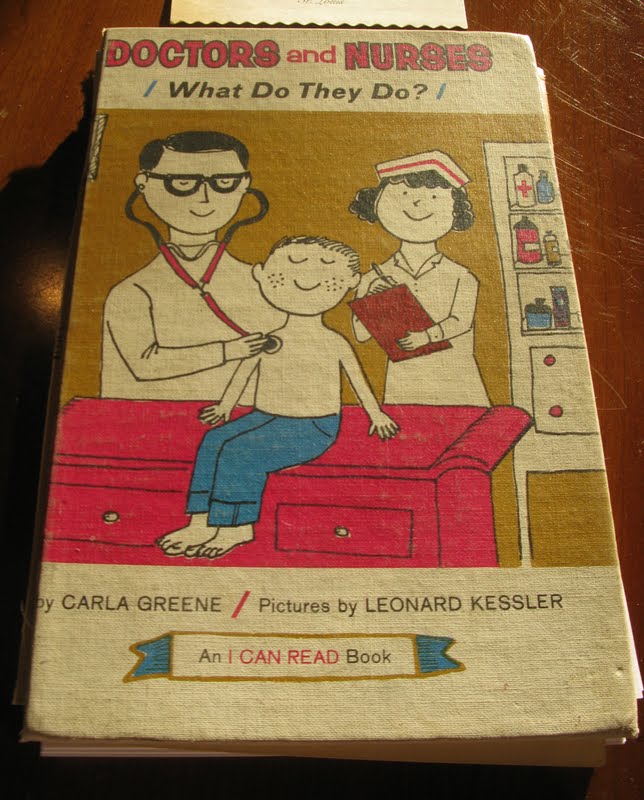
It will be all I can do to not keep the "Strange Woman" journal - it is old and stained, but so fun, isn't it? And the doctors and nurses book - whoooooeeeeeee - possibly the most sexist children's book I have ever read, but I love the cover. We'll see if it sells - maybe to a nursing or medical student?
These journals will be in my etsy shop on Friday - there are others too, so please check in! And I also have a small selection of these at Peridot. Enjoy your days! xo
Tuesday, July 26, 2011
Be my guest?

I am signing up for Heather's 30-Day Vegan Workshop (all online) today and she is generously offering to let all participants invite a guest for free. All she asks is that the guest be genuinely interested and motivated to participate.
Would you like to join me? Leave me a comment and your contact info and I'll be in touch.
Click here to read more about the workshop. xo
Note: space has been filled - thanks!
Monday, July 25, 2011
book baking

Just wanted to share that if you have an old book that you love, and it's a bit musty, you can always set it outside in the (not quite direct) sunlight and let it sit for a spell. The heat and the sun will work miracles! xo
Friday, July 22, 2011
brick + mortar

Peridot
3159 Cherokee Street, St. Louis 63118
314.771.3571
T - S 11a to 5 p
Sun noon to 4 p
Thursday, July 21, 2011
birthday p.s.

The second is because of what happened on Tuesday. I caught my two oldest children in a very conspiratorial look as they, without words, totally made fun of my singing. Making fun! Of me! Their mother!!!! So I'm watching as the days of them thinking I'm the best singer in the world slip through my fingers. Then, it occurred to me yesterday as they were loving my painting progression, that soon they will also stop believing that I'm the best artist in the world too. Rats.
So I'm posting it as a memory that this birthday was a day when, in the eyes of my children, I couldn't sing, but I could still paint! Amidst all the sleep deprivation and laundry and lunch making and soccer games, it's been nice to be highly regarded in these very small ways for all these years. We had a good run - and maybe, just maybe, Kyle's still on board. Just a wee bit?
Enjoy your Thursdays! xo
Wednesday, July 20, 2011
Growing and older...

Today I am forty-three. I woke up to coffee served bedside, then a lovely breakfast with handmade treats and this lovely gift. Idiot proof I was told. Cheap (for experimenting with tutorials) and idiot proof. Well, not quite - I did make a little video of the kids, but I can't seem to upload it. Hmmmmm...so is this not idiot proof or am I...
Anywho, I've had a perfect day! Worked a little, gardened a little, thrifted a little. Joey put together a still life for me and I'm trying to paint it. Painting is so renewing - even if you're (I'm) horrible at it. If you want to try painting, but feel intimidated, browse through Alisa's videos - she is so inspiring and so empowering about just trying it! You (I) can't become a painter if you (I) never paint!
Off to dinner...then hopefully a quiet night at home. xo
Thursday, July 14, 2011
[GARO11] July 14


What do you think of the green? I never intended to have a green that deep. I do this all the time - pick something muted and subtle and then change my mind at the paint store. A friend said, "I need that exact shade of green in my life in the middle of winter," which I think it is a great point. I'm not going to make time to repaint it, so we'll see how it looks when the room is done. I love the grey - love love love it!
And, I could not be happier with the lighting and new ceiling fans. Third floors get hot and these are working great!
So there is a classroom area, a space for my work and supplies and a seating area. I still need to find a comfy rug (trying to design a room where my kids want to hang out too), but overall, big purchases are done. Phew!
Happy Thursday! xo
Wednesday, July 13, 2011
journals journals everywhere!

I'm back to journal making over here and it feels fantastic!


Welcome to all the Whip Up readers who are popping in and thanks to Kathreen for linking to my wedding fan program tutorial! xo
Tuesday, July 12, 2011
My annual mushy gushy
Dear David,

It's moments like this that make me think these two opposing thoughts at exactly the same time:

1. I wish I could support our family so that you could have some time during this season in our children's lives to just be home "be"ing with them, and 2. I am the luckiest person alive to have this time with our kids.


Just another small moment to teach our kids to help, but to help with the needs of the "other" in mind. (Look at that smile...I'm melting...oh wait, that's just the 100 degree temps outside.)


But mostly I was thinking what I think this praying mantis might have been thinking...

P.S. Photos by Joey.
P.P.S. Here's last year's mushy gushy...overshares end again today for another year! ;)
Friday, July 8, 2011
weekending...


Wishing you a wonderful weekend, hopefully with time to do a bit of art (photo 1) or map out where you might hide a magical key (barely seen in photo 2) or carve a magic wand (photo 3). Photo 3's wish is especially for you if, like our family, you have kids who most definitely will be seeing Harry Potter VII Part Two next week, and kids who most definitely will not be seeing Harry Potter VII Part Two next week! xo
Thursday, July 7, 2011
Wedding Program Fans - tutorial

Step 1: Design the program. (We did this on the computer, but it would also look great handwritten and copied). Our programs measured 6 inches wide by 7.5 inches tall. For easy assembly, we very lightly printed out cut lines (for the program itself) and sewing lines (for the stitching). When you're done with the typesetting, print out your programs on cardstock and cut them out - straight sides only - leaving the corners to be cut later.

Step 2: Choose your paper. These fans could be printed on both sides - in which case you would print on cardstock. We decided to keep the text simple (the ceremony was short) and use art paper for the backs. Erin wanted every fan to feel different, so we bought three different scrapbook paper packs from Michaels and she pulled out her favorite sheets. We could fit two fans to one sheet of paper.

Step 3: Cut art paper into 6 x 7.5 inch rectangles and set aside. For best results, use paper that is heavier than computer paper. Thick card stock is not necessary, but a heavier weight paper will stand up better as a fan. You'll cut the fan corners later.

Step 5: Gently sand the edges. Again, this just makes the fans feel/look a bit more custom. David took a piece of scrap wood, wrapped it in sandpaper and rubbed the edges. This step took seconds per handle.

Step 6: Sew the front and back of the fans together. The photo above is horrible, but I wanted to show you our "cheat" lines. The dark line was the outline, so we cut those along the straight edge first and left the corners uncut. Now, look closely and you'll see that very very faint line? That was the guide for our sewing. It had about an inch of blank space at the bottom (where you'll eventually insert the handle) and so we started to sew at the bottom right, sewed around the whole program and then stopped when we reached the blank space on the bottom left. (If you look below "Andy" and a bit to the left, you can kind of see how the line ends.)

Step 7: Relax. Our lines weren't perfectly straight. Sometimes we missed the corner altogether and there was a very faint line to be seen. No one noticed this but us, and the detail of the stitching was just gorgeous!
Step 8: Assemble and finish. We put 2" of double-sided tape at the top of the flat side of our wood handles, inserted the handle into the fan flat side facing the text side and pressed firmly into place. Trust me, they won't move. Finally, take a scissors and round your corners so that everything lines up.
Done.

Additional Details:
Erin chose gold thread and I was totally skeptical (worried it would be slippery, unravel, etc.). It worked beautifully and was the perfect choice!
This project is not a timesaver in anyway, but once you're in the groove of it, progress moves along quickly.
When all was said and done, these fans cost less than $1 each - totally worth the time investment required.
The handles could be painted or stained.
If you use a "cheat" line for your sewing, choose the lightest shade possible in the same color family as your thread. We used gold thread so our line was a light light brown.
Other ideas to try would be text on both side with simple, gorgeous cardstock and a crazy color of thread - purple or peacock with cream cardstock for instance. The possiblities are endless!
Finally, the fan/program combo could be used for many other events: murder mystery parties, garden parties, any outdoor fundraiser...
Please let me know if you make your own! xo
Monday, July 4, 2011


Subscribe to:
Posts (Atom)
