
Sunday, January 30, 2011
If I had a million dollars...
Holy cow...if you have any kind of paper passion at all...go here right now. xo
Thursday, January 27, 2011
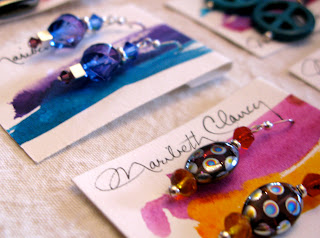
Maribeth Clancy: : Paint + Jewelry
Welcome to the studio (and dining room!) of Maribeth Clancy, jewelry designer, painter, photographer, fiber artist, bookmaker, teacher and mentor.


 Maribeth incorporated ink blowing into her home school class curriculum,


 She is an avid journaler and artist trading card maker.


Weekly, she home schools her daughter, teaches art classes to kids, hosts a journaling group for women and creates her own art in this space.

Obviously, this space is full. She has to have a vast assortment of supplies on hand for her art, and her students, who range from beginners to advanced artists.

She calls it chaotic, but I was impressed with how organized it is.

Did I mention that she also teaches adult classes? She teaches painting and bookmaking. She's also designing her second watercolor session for a men's only class.

There's art paper everywhere!

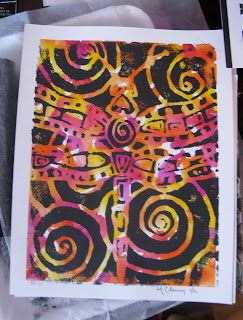
Spirituality and nature are infused into her work.


This piece was inspired by the documentary, "Who Does She Think She Is?" Maribeth encourages all of her students to watch it.

She loves painting mandalas.


Maribeth participates in about four art shows a year. These are some of her best selling photographs.

Journals are one of her signature items. The inside pages are a combination of art paper, pockets and sometimes inspirational quotes and journaling cues.

Isn't this a great idea? Sometimes Maribeth strings ideas or mantras to her journals to be used as page markers.

She paints these journals with a handmade glue and paint combination (she calls it "goop"). Then she can sprinkle glitter and other embellishments in it while it dries.

And she even paints her jewelry tags.


...and discovered that it was a wonderful way for her to paint natural images.

Here's another fun technique. Maribeth takes inch cut outs from her paintings and photographs to create inspirational collages.


This ATC is from a journal page. One of her personal goals is to create an ATC a day in 2011.

She and her daughter will be collaborating on designing her website.

And she is partnering with a local retreat and yoga center to teach and create on site.


If you are interested in seeing Maribeth's art or joining her mailing list to learn of upcoming shows and classes, email her at mmghh@charter.net.
Thanks Maribeth!
Wednesday, January 26, 2011
How to make collaged Valentines
Something I am thinking about a lot these days is scope. I often start these projects for myself and my kids that we just can't (don't) finish. Valentines are a perfect example - it is common in this house for the first-made Valentines to be wayyyyyyyy better (sometimes this just means finished) than the last. This tutorial, while not a time saver per se, is a guaranteed equalizer!
 1. Gather. You will need one piece of heavy paper or cardstock for your collage, scissors, magazine pictures (or stickers, colored paper, whatever you have), glue and card-making supplies (cardstock and envelopes if desired).
2. Select. Encourage your child to pick images that s/he loves. For this project, it is a good idea to select three small images for every one big image.
 3. Arrange. Ask your child to cut around pictures as desired and put them on the page without gluing them. Now, check for white space - is this ok with you? If not, look through your scraps and fill in (usually scraps of paper in pleasing colors will do the trick).
 4. Glue. With glue sticks, adhere your pictures to your page - try to glue as thoroughly as possible. Remind your young artist that there is no wrong way to collage and "straight" and "orderly" won't make today's final product any better.
 5. Dry and Cut. Allow your collage to dry completely. Now, pick a shape. Cut a piece of cardstock out that will be the size as your finished card - from that card, draw and cut out your shape. Remember that the smaller your card is, the more shapes you will be able to cut from your collage.
 6. Trace. When your collage is dry, turn it over and trace your heart in as many places as possible without looking at your collage.
 7. Cut out your shapes.

 Viola!
Notes:
For younger children, the shape should be larger, so that more pictures show up in each shape.
If your child only wants to make one collage and you have a big class/group to give Valentines to, color photocopy the collage before cutting it.
This project can "grow up" into other things. Here is this method using art paper in a specific color scheme. These hearts adorned wedding program covers.


2. Select. Encourage your child to pick images that s/he loves. For this project, it is a good idea to select three small images for every one big image.


8. Assemble. Glue your hearts to your cards and write on them as you please. If you want to embellish your envelopes, use the scraps. [Consider postcards if your child just wants to sign his/her name and be done!]

Notes:
For younger children, the shape should be larger, so that more pictures show up in each shape.
If your child only wants to make one collage and you have a big class/group to give Valentines to, color photocopy the collage before cutting it.
This project can "grow up" into other things. Here is this method using art paper in a specific color scheme. These hearts adorned wedding program covers.

xo!
Tuesday, January 25, 2011
Valentine Recipe - Steamed Vanilla

Vanilla syrup is such a fun gift for kids of all ages (to give and recieve) and it's sooooooo easy to make.
Vanilla Syrup
3 cups sugar
3 cups water
3 Tbsp. vanilla
Bring sugar and water to a boil, simmer lightly for three minutes.
Stir in the vanilla and let cool to room temperature.
Pour into jars and refrigerate.

The recipe we include with it is for Steamed Vanilla. Again, so easy, and such a crowd pleaser. If your kids can't tolerate chocolate caffeine (cocoa) in the evenings, this is a great alternative (note that it still has plenty of spaz-inducing-for-some sugar).Stir in the vanilla and let cool to room temperature.
Pour into jars and refrigerate.

Steamed Vanilla
Gently warm one cup of milk.
Add 1 Tbsp. of vanilla syrup (or to taste).
Pour into your favorite mug or cup.
If desired, sprinkle with cinnamon.
If desired, sprinkle with cinnamon.
This gift can be given simply in glass jars. You could pair it with a whisk to fancy it up a bit. And it would be delicious accompanied with these cookies.

Monday, January 24, 2011
How to make Valentines Day headbands
It's Valentine week here at Goodness Recycled! Thanks for checking in! Here is a very simple tutorial for embellishing your own Valentines Day headbands.


The reason it's simple is because there's no wrong way to make them, and limitless fun combinations.

Step 1. Gather
Find Valentine-colored supplies in your craft stash: felted sweaters, felt, buttons, pom pons, embroidery thread, needle, scissors, (not shown: needle felting supplies), and of course, headbands.

My daughter loves these headbands and coincidentally they are made of fabric so it is easy to sew your embellishments right to the band. You could also use plastic headbands - this would require glue rather than needle and thread for assembly.

Step 2: Create
Without planning yet for your headband, cut out shapes, sew buttons, assemble different combinations of colors (what other animals could you make from hearts?).

Step 3. Ignore imperfections
Just make some things that are pleasing to you - not too big, not all the same.

Step 4. Assemble
Now, take different components and combine them for your headbands. It wasn't until I made the circle with the big button [above] that I thought about sewing buttons to a heart [top photo].

Step 5. Attach to headband.
Sew back and forth through the material part of your headband. Remember that if you have a double layer of felt, or a big button or embellishment, you can sew behind that and the stitch will not be seen when the headband is worn. (If need be, review Step 3.)

Step 6. Deliver
Give headband to your favorite Valentine!
Thanks to my daughter for modeling! xo
Friday, January 21, 2011
Friday tidbits...

1.
Can't stop needle felting!
The above is a small flower that I hope to sew to a hat made of the thrifted Gap sweater below it.
2.
I mentioned that I want to take an online class. I think I have it down to three favorites: this one, this one and this one has started, but you can still join in.
3.
If you love quilts and color, you have to go check out Anna Maria's quilt auction right now. All money raised will be donated to help flood survivors in Queensland.
4.
Knitting and folding laundry while watching Harry Potter with a sick kid is a fine way to spend a Friday.
5.
Although I really wish I was here.
6.
Happy Weekend! xo
Thursday, January 20, 2011
First flower & a snow day
Well, my week's plans have all gone awry. I have a sick kid at home and my Valentines Week plans were foibled by the greyest, worst-photo-taking week in a long time. Then this morning? Oodles of snow, a snow day and lots of light, so I can't post my studio tour now (way too dark). I'm going to retake some of the photos of this artist and post her story soon.
 Here is a picture of the first flower I've needle felted. So fun!! A friend asked if I would try to make her one, so I did and I hope she likes it. It's for a black winter hat - I can't decide what I think about the seed beads - too many? not enough? I also hope that for a hat, this isn't too big.
Here are some more felting questions - when do you know you're done felting? Can something be over felted? When I find out, I'll let you know.


Here are some more felting questions - when do you know you're done felting? Can something be over felted? When I find out, I'll let you know.

I'll have a kid home sick tomorrow too, so maybe we'll just call this "random week", I'll try to post something and we'll start fresh on Monday.
Stay warm! xo
Tuesday, January 18, 2011
Simple "handmade" valentines
Today is quite possibly the darkest, greyest day of the year - excuse the dark photos. Last year Kyle and I started making puffed, sewn hearts for his class. They were simple enough, but stopped being fun to their maker after about two and a half were complete. You-Know-Who finished the rest.

This year, I'm going to ask my kids to make one small piece of art. Then I'm going to encourage them to incorporate that one thing into a simple drawing or a photo that we will then copy into bulk Valentines.

[simple doodle on old book cover with felted hearts]

Simple! xo!
Subscribe to:
Posts (Atom)
